Install using Helm
This document explains how to use Helm to install, upgrade, or uninstall Harness Self-Managed Enterprise Edition. This document describes an installation on Google Kubernetes Engine (GKE). The same installation process, however, applies to installations on Kubernetes versions 1.x and later.
Helm package manager provides a declarative approach to Kubernetes application management in which software packages are specified as “charts.” For more information, go to the Helm documentation.
You can also install Harness Self-Managed Enterprise Edition in an air-gapped environment. For more information, go to Install in air-gapped environment.
Role requirements
The account you use to install Harness Self-Managed Enterprise Edition must have the Account Admin role to create service accounts. For more information on role-based permissions, go to RBAC in Harness.
Download the Harness Helm chart
To download the Harness Helm chart for the installation of Self-Managed Enterprise Edition, go to the Harness Helm chart repo.
Harness Helm charts are available for demonstration and production environments.
Update the override.yaml file
Helm chart values, default value definitions, and field descriptions are available in the Harness Helm chart repo.
Depending on your target environment, you'll need to update the override.yaml file to specify a load balancer or to specify the Harness modules to be deployed.
Add a load balancer
Use the following procedure to add a load balancer.
To add the URL for a load balancer, do the following:
-
In the
values.yamlfile, set theglobal.loadbalancerURLfield to the URL of your load balancer. This is the URL you use for Harness.global:
# -- Harness Application URL
loadbalancerURL: http://<load-balancer-IP-address> -
Set the
host_namefield to the IP address of the load balancer. -
Save the file.
Deploy Harness modules
Harness Helm chart includes Harness Platform components. You can add modules by editing the override.yaml file.
The Platform component and the module below is enabled by default:
- Harness Continuous Deployment (CD) - Next Generation
The Harness modules below can be enabled or disabled conditionally:
- Harness Chaos Engineering (CE)
- Harness Cloud Cost Management (CCM)
- Harness Continuous Integration (CI)
- Harness Security Testing Orchestration (STO)
- Harness Service Reliability Management (SRM)
- Harness Feature Flags (FF)
- Harness Continuous Error Tracking (CET)
- (Beta) Harness Software Supply Chain Assurance (SSCA)
You can conditionally disable or enable the modules by specifying a boolean value in the enabled field of the YAML:
Deploy the CI module
ci:
# -- Enable to deploy CI to your cluster
enabled: true
Deploy the SRM module
srm:
# -- Enable to deploy SRM to your cluster
enabled: true
Deploy the FF module
ff:
# -- Enable to deploy FF to your cluster
enabled: true
Deploy the STO module
sto:
# -- Enable to deploy STO to your cluster
enabled: true
Deploy the CCM module
ccm:
# -- Enable to deploy Cloud Cost Management (CCM) to your cluster
enabled: true
Deploy the CE module
chaos:
# -- Enable to deploy Chaos Engineering (CE) to your cluster
enabled: true
Deploy the CET module
cet:
# -- Enable to deploy CET to your cluster
enabled: true
Deploy the SSCA module
ssca:
# -- Enable to deploy SSCA to your cluster
enabled: true
Add a Harness license
Harness Self-Managed Enterprise Edition needs a license to be provisioned for the Harness NextGen platform. Contact Harness Support to procure the license and add it to the override.yaml file.
  license:
    # -- Insert CG License String to enable CG license
    cg: ''
    # -- Insert NG License String to enable NG license
    ng: ''
Install the Helm chart
To use the charts, you must install Helm. To get started with Helm, go to the Helm documentation. After you install Helm, follow the instructions below.
To install the Helm chart, do the following:
-
Add the repository.
helm repo add harness https://harness.github.io/helm-charts -
Create a namespace for your installation.
kubectl create namespace <namespace> -
Modify the
override.yamlfile with your environment settings. -
Install the Helm chart.
helm install my-release harness/harness-prod -n <namespace> -f override.yaml
Verify the installation
After the installation completes, the services that were installed are enumerated with their status.
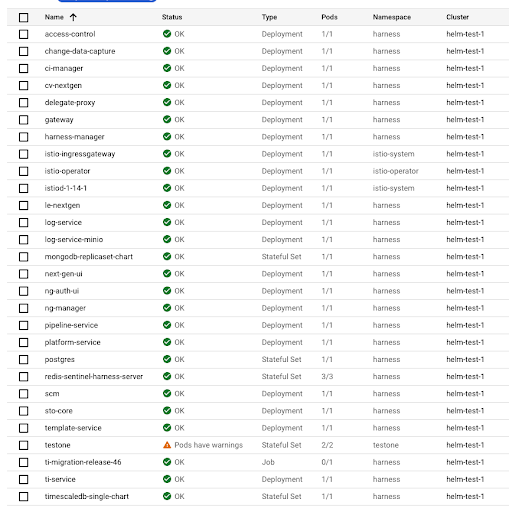
The services that appear depend on the modules that were installed.
To verify installation, do the following:
-
Review the list of services.
-
In your browser, type the following instruction:
http://localhost/auth/#/signupIf the installation was successful, the Harness Sign up page appears.
Helm chart values
For details about the chart values, explanations of the default values, and descriptions of the fields, go to https://github.com/harness/helm-charts#values.
Use self-signed certificates with Helm-based installations
There are additional steps for self-signed certificates:
- Install delegates with custom certificates
- Configure a Kubernetes build farm to use self-signed certificates
- Configure GitOps Agent with self-signed certificates
Next steps
After installation is complete, you should create the initial Harness account, and then create organizations and projects.
To get started with the modules, review the following topics:
- For Harness Continuous Integration, go to the CI key concepts.
- For Harness Continuous Delivery & GitOps, go to the CD key concepts.
- For Harness Security Testing Orchestration, go to the STO overview.
- For Harness Chaos Engineering, go to Get started with Harness Chaos Engineering.
- For Harness Cloud Cost Management, go to Manage cloud costs by using Harness Self-Managed Enterprise Edition.
- For Harness Continuous Error Tracking, go to the CET onboarding guide.